Change requests
What are change requests?
Change requests are the transaction types participants submit to MSATS Market Settlement and Transfer Solutions. The procedures published by AEMO under clause 7.2.8 of the National Electricity Rules, which include those governing the recording of financial responsibility for energy flows at a connection point, the transfer of that responsibility between market participants, and the recording of energy flows at a connection point. to create or update NMI Standing Data See National Electricitiy Rules. Change requests include:
- Names and relationships of incumbent companies having Roles associated with the NMI See Relevant Rules or Procedures.
- Standing details required to support PPS Profile Preparation Service: Calculates profile shapes by using algorithms and interval energy data. The calculation of the NSLP or the CLP., BMP Basic Meter Profile: The application of profile shape data to accumulated metering data to create half-hourly interval metering data for a Profile Area. Records the total amount of energy consumed at a connection point from the initial energisation of the meter., Data Aggregation An aggregation implies there are at least two or more classified NMIs in the dispatchable unit for central dispatch. and Settlement.
- Standing details required to support NMI Discovery.
- Standing details in the Metering register, which includes Standing Data about Metering installations, including meter register data.
A change request is a temporary transaction that goes through a life cycle similar to the following:
- The initiating participant creates the change request and specifies which data to change and when.
- Other parties involved in the change request are notified of the change, and when it is to take place.
- If those notified have a right to object, they can submit an objection.
- All parties (including the initiator) are notified that an objection has occurred.
- The party that submitted the objection may subsequently withdraw it.
- Assuming all objections are withdrawn before a specified number of days, the change is eventually completed.
- If the change was objected to and the objection was not withdrawn, then the change is eventually cancelled by MSATS.
Generic steps of a change request
To demonstrate the generic steps involved in creating a change request, the steps in the following example use change reason code 1000, (change of transaction) and edits the participant Role The role a company has with a connection point in CATS. A single company can have more than one role associated with a NMI. relationship category (other categories cannot be changed for the change reason code 1000).
Figure 92 Generic change request steps
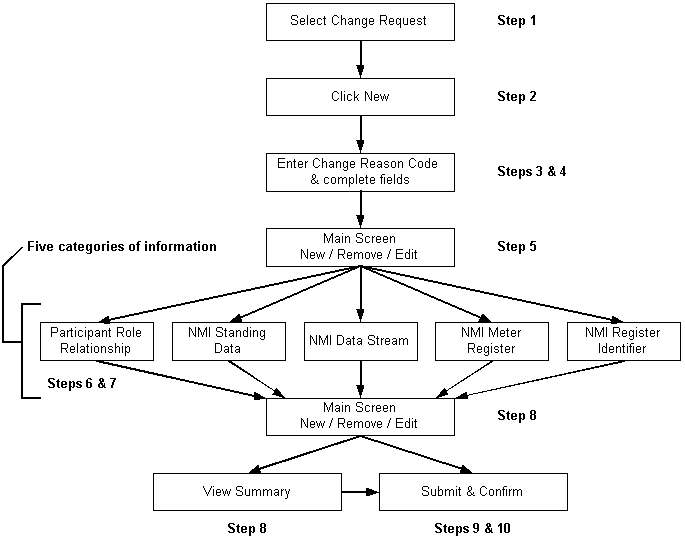
As shown in Steps 6 and 7, there are five categories of accessed information, depending on the change reason code used:
- Participant Role relationships
- NMI Standing Data
- NMI Datastream
- NMI meter register
- NMI register identifier
For each category, a list of records appears on the change request transaction. If records appear in the list for a particular category, then information records are already linked. These information records may be changed. If the list is blank, then the participant must create new information records for that category. All relevant information must be present in these category lists for the change request to pass validation.
A change request is not completed until all of the following conditions are met:
- The proposed date has passed.
- The objection period has passed.
- The change request does not have any active objections lodged against it.
- It is not waiting for an actual change date to be returned by another party.
When all conditions are met, the change request moves to completed status and the new participant name appears as the FRMP Financially Responsible Market Participant, usually a retailer, Generator, Market Customer or a Market Small Generator Aggregator, identified in respect of a connection point. Responsible for dealings with AEMO in relation to a specific load. on the main interface.
For help understanding the change request rules, see Administration.FRMP
You can also:
- Acknowledge a change request (see Data Load Import).
- View a change request response (see Data Load Import).
Searching for a change request
To search for change requests:
- On the main menu, click Transactions and then click Change Requests.
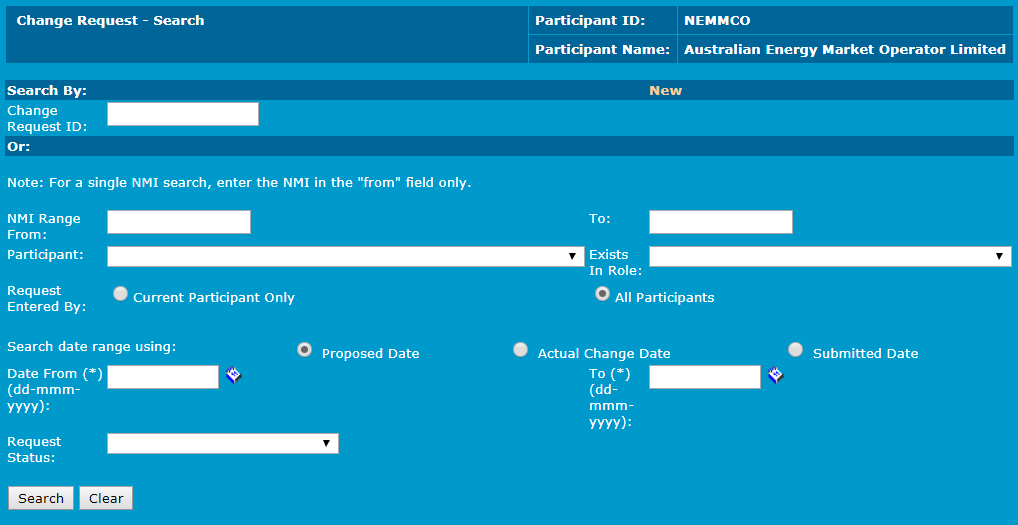
- The Change Request - Search interface displays. To search for a change request do one of the following:
- Enter the Change Request ID in the Search By: section and click Search.
- Enter the change request details in the fields in the Or: section and click Search. The Date From and To fields are required.
- The Change Request - List interface displays the results with the following options in the Action column:
- View the change request details.
- Show All displays change request history.

Figure 93 Change Requests - View
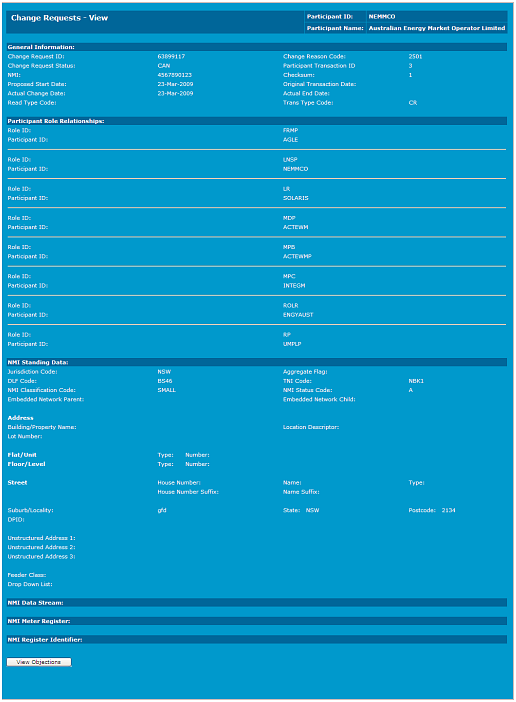
To return to the Change Request - Search interface, on the main menu click Transactions and then click Change Requests.
Creating a new change request
Creating a new change request allows participants to add an item to the change request, for example a new Datastream, meter, or meter register.
To create a new change request:
- On the main menu, click Transactions and then click Change Requests.

- The Change Request - Search interface displays, click New.
- The Change Request - New interface displays. Click the Change Request drop-down arrow to select a change reason code. The change reason code selected determines the type of transaction to create. To learn more about change reason codes, Administration.
- Click Next.
- Complete the required fields and any other optional fields and click Next.
- The Change Request - Main interface displays, click View Summary to review the details.
- The Change Request - Summary interface displays, review the details and do one of the following:
- Click Submit to create the new change request.
- Click Cancel to cancel the submission (not submit any changes).
- Click OK to confirm the submission.
- Confirmation of the change request submission displays with your Change Request ID.
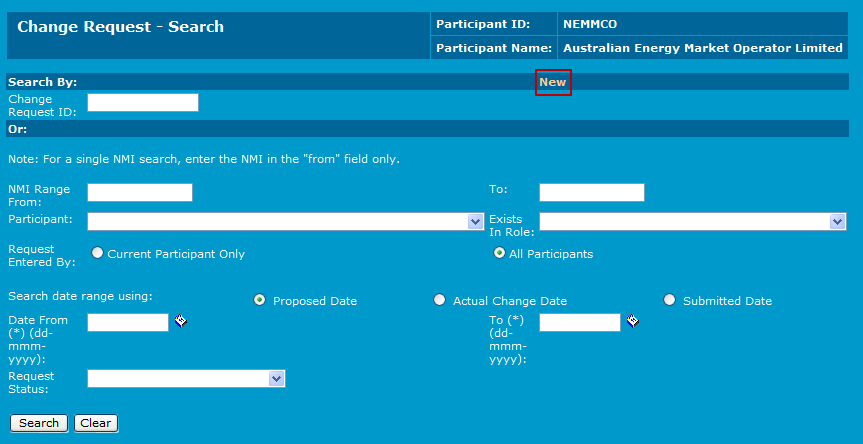

The fields differ depending on the change reason code selected. The example below displays the fields for the change reason code 2500 (Create NMI, Datastream + Meter Details).

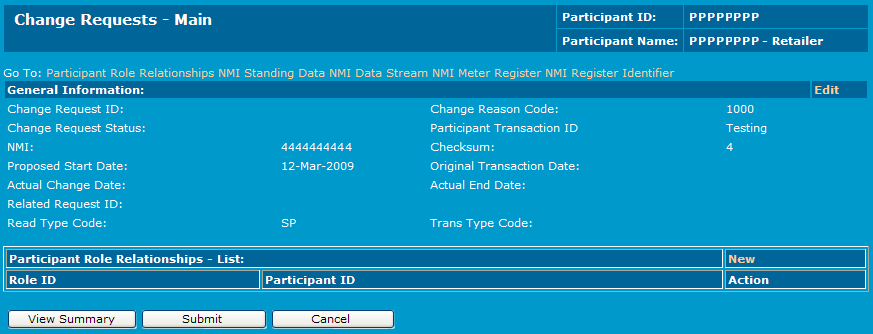
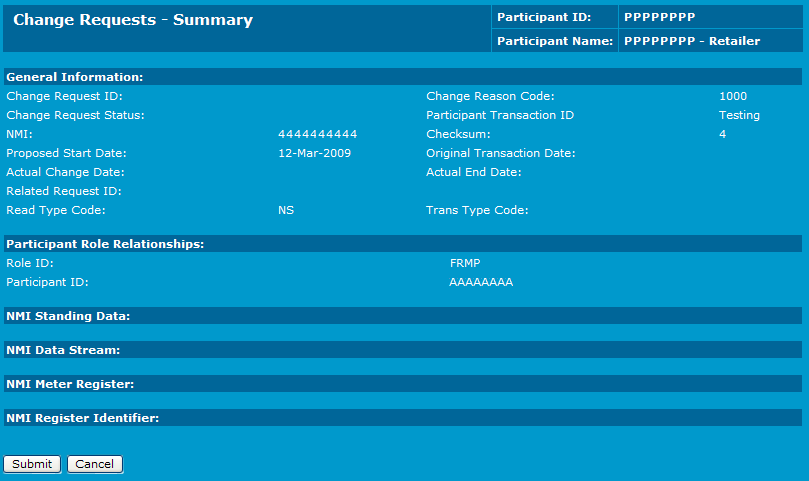
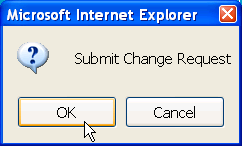
The ID appears on all change request notifications and is used to locate and track its progress.
The change request is saved, but the master record is not updated until the change request reaches Completed status. This occurs at the end of the objection and nominated proposed date period.
It is possible for change requests of the same type to be active at the same time against the same NMI, except for 1xxx series change requests (for which concurrent validation is disallowed).

Editing a change request
Editing a change request allows participants to edit existing Standing Data details for the nominated item (for example, Datastream, meter or meter register) or to change existing information about a change request.
Removing an item from a change request allows participants to delete items already on the change request (assuming they are not protected by any business rules).
To edit an existing change request:
- On the main menu, click Transactions and then click Change Requests.
- The Change Request - Search interface displays. Search for the change request to edit (Searching for a change request).
- Click View in the Action column next to the Request ID.

- The Change Request - Main interface displays, do one of the following:
- Click Edit make the changes to Standing Data or a category list.
- Click Remove to delete items that have already been put on the change request.
Note: If you cannot see Remove in the Action column, the data is protected by business rules and cannot be removed.
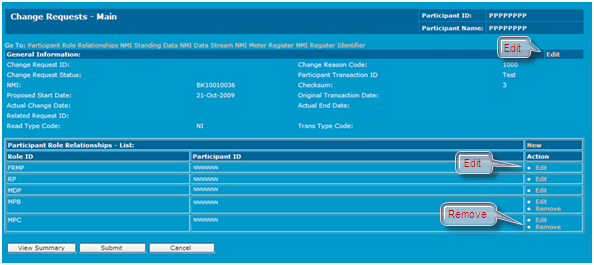
- The Change Requests - Edit interface displays, make the required changes and click Save.
Withdrawing a change request
A change request transaction can only be withdrawn if it is not complete, cancelled, or rejected. The status is then changed to cancelled (CAN).
To withdraw a change request:

- On the main menu, click Transactions and then click Change Requests.
- The Change Request - Search interface displays. Search for the change request to withdraw (Searching for a change request).
- The Change Request - List interface displays. Click Withdraw in the Action column next to the Request ID.
Note: if you cannot see the Withdraw link in the Action column, the change request cannot be withdrawn.

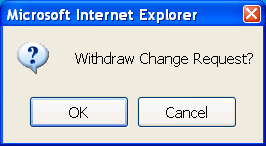
- Click OK to confirm the change request withdrawal.
Viewing change request history
Inactive change request records are purged after a certain time and are no longer viewable.
The Change Request - Show All interface displays change request history such as:
- Transaction See Relevant Rules or Procedures details in its original state before any modifications.
- A full audit trail of the transaction life cycle.

To view change request history:
- On the main menu, click Transactions and then click Change Requests.
- The Change Request - Search interface displays. Search for the change request to withdraw (Searching for a change request).
- The Change Request - List interface displays. Click Show All in the Action column next to the Request ID.

- The Change Request - Show All interface displays the change request history.

Creating participant role relationships
An additional Role of NSP2 Second Network Service Provider: The Role assigned to a DNSP for a transmission connection point (wholesale NMIs) having two NSP roles. is created for all wholesale connection points. This is completed by AEMO Australian Energy Market Operator after the NMI is created.
Participant Role relationships define the Roles played by Market Participants against a particular NMI record.
The Roles assignable to participants for a NMI are:
DRSP | Demand Response Service Provider |
FRMP | Financially Responsible Market Participant |
LNSP | Local Network Service Provider |
LR | Local Retailer |
MDP | Metering Data Provider |
MPB | Metering Provider - Maintenance |
MPC | Metering Provider - Data Collection |
ROLR | Retailer of Last Resort |
RP | Responsible Person |
When the above Roles are selected during the change request process, they are only nominated for assignment to the NMI. When the change request is in Completed (COM) status the NMI details, including Role relationships, are saved permanently.
The Roles against a current change request can be modified up to the date that the change request is in a status of complete (COM). However, if any information in a change request is modified while it is in progress, the change request is assigned a new Request The way information is returned from an API. In a request, the client provides a resource URL with the proper authorization to an API server. The API returns a response with the information requested. ID and the cycle restarts.
When a NMI is created, all the Roles must be allocated on the change request for setting up the NMI. Based on the current CATS Customer Administration and Transfer Solution. A set of procedures, principles and obligations made under the National Electricity Rules as part of Market Settlement and Transfer Solutions (MSATS), and applicable to NMI (National Metering Identifier) small and large classifications. procedures, this change request is normally created by the LNSP. All participants that are nominated in a Role against a new NMI are sent a notification (to the participant outbox) informing them of the NMI and the Role the LNSP has asked them to undertake. These participants then have all the information required to object to this nomination.
Once a NMI is created, specific change requests are entered to change individual Roles or groups of Roles. For example, there is a specific change reason code used to change the local transaction, allowing only that Role to change. Change requests to change Retailer See Relevant Rules or Procedures (for example, CR1000) generally allow specification of a new DRSP Demand Response Service Provider, FRMP, MDP Meter Data Provider. An organisation which installs, commissions, gathers, and verifies data remotely from meters in the National Electricity Market (NEM)., RP Responsible Person. The participant with formal responsibility for the provision, installation and maintenance of a metering installation., MPB See MP and MPC Market Price Cap. The National Electricity Rules’ maximum price at which gas can be bid, offered, or scheduled in the market. The AEMC’s Reliability Panel reviews the MFP every four years..
To add a new participant Role relationship:
- On the main menu, click Transactions and then click Change Requests.
- The Change Request - Search interface displays. Search for the change request (Searching for a change request).
- The Change Request - List interface displays. Click View in the Action column next to the Request ID.
- On the Change Request - Main interface, in the Participant Role Relationship section, click New.
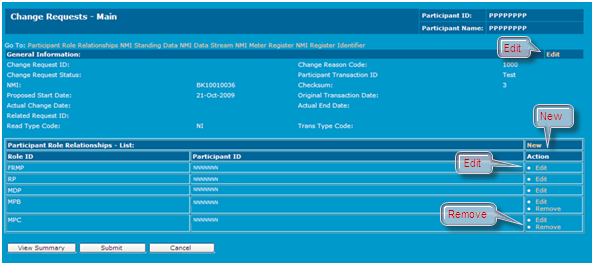
- The Change Request - New - Participant Role Relationships interface displays. Click the Role ID drop-down arrow and select from the list.
Note: a required Role cannot be removed, only replaced with another Role.
- Click the Participant ID drop-down arrow and select from the list.
- Click Save.

Creating or editing NMI standing data
NMI Standing Data is the information captured against a NMI that includes its NMI classification, TNI and DLF Distribution Loss Factor. The loss of energy, due to electrical resistance and the heating of conductors, as electricity flows through the transmission and distribution networks. codes and details of its physical location.
To create NMI Standing Data:
- On the main menu, click Transactions and then click Change Requests.

- The Change Request - Search interface displays, click New.

- The Change Request - New interface displays. Click the Change Request drop-down arrow to select a change reason code for example, Create NMI Details (2001 or similar) or Change NMI Details (5051 or similar). The change reason code selected determines the type of transaction to create. To learn more about change reason codes, Administration.
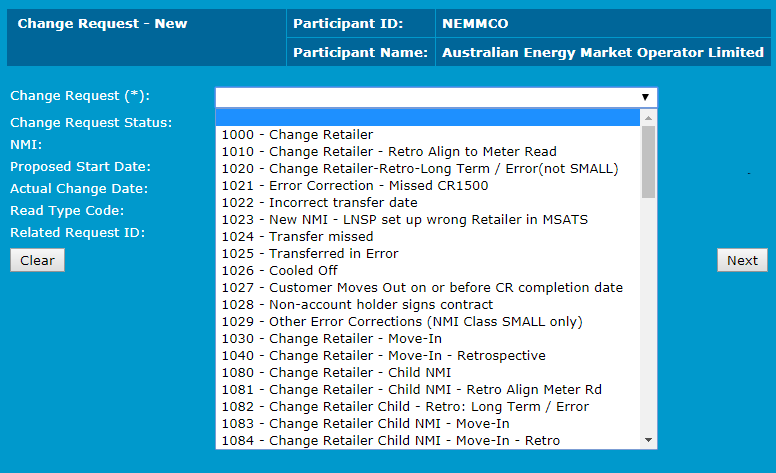
- The fields for the selected change reason code display. Type the NMI details and click Next. For help understanding the fields, see NMI Standing Data fields.

- The Change Request - Main interface displays. Scroll to the NMI Standing Data - List at bottom of the interface. For both new and existing NMI records, if there is no information displayed in the list; click New.
Note: if the NMI Standing Data - List heading is not displayed, you cannot create or modify NMI Standing Data using the selected change reason code.

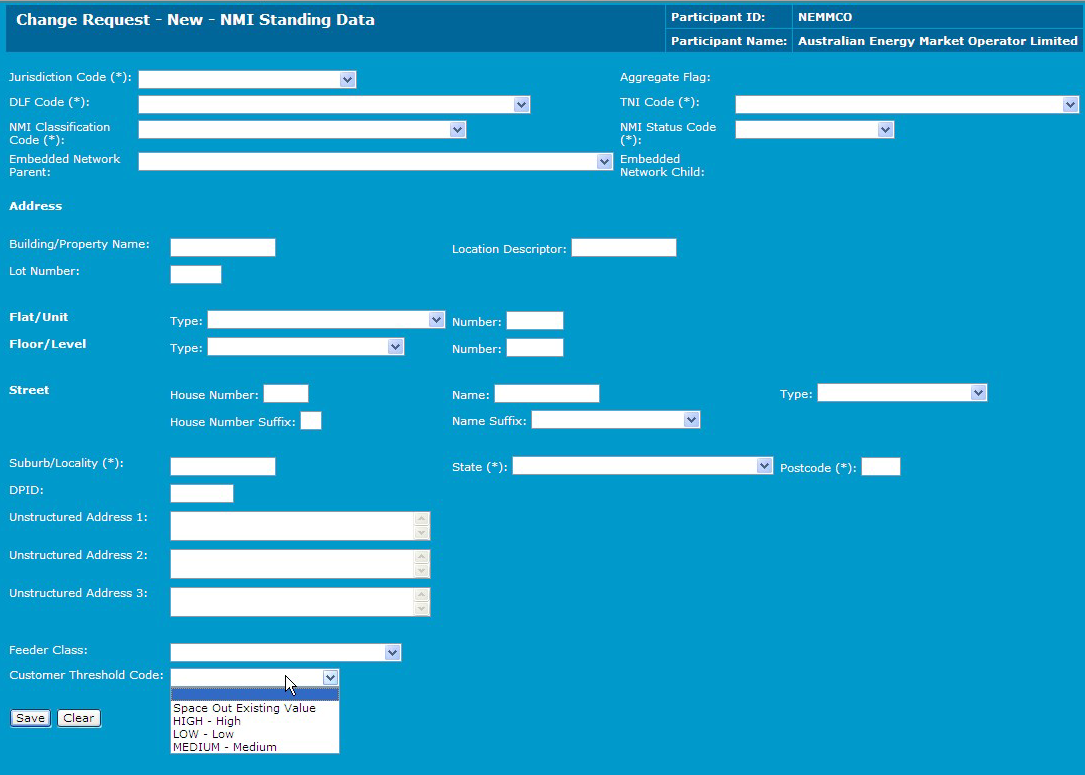
- The Change Request - NMI Standing Data interface displays. Type your changes and click Save.
- For a new NMI, complete the required fields, marked with an asterisk (*) and any other optional fields.
- For an existing NMI, only complete the field(s) that you want to change.
Important Note: if an existing NMI is being changed, all the values in this interface are blank, even if some of them have an existing value. The only existing values displayed are those in the NMI data list on the Change Request - Main interface.
- Click OK to the confirmation message.
- The NMI Standing Data record is summarised in the NMI Standing Data - List table. Do one of the following:
- To make changes to the details before submitting, click Edit.
- Click Submit to create the new change request.
To create Datastream or Metering details, providing you are using a change reason code that allows (Creating or editing NMI datastreams, Creating or editing NMI metering installation details, and Creating or editing NMI register identifier details).
Note: notice the New option is no longer available.

NMI Standing Data fields explains the NMI Standing Data fields with a brief description. For more information, see Standing Data for MSATS.
Table 39 NMI Standing Data fields
Field | Description |
|---|---|
Jurisdiction Code* | Jurisdiction code to which the NMI belongs. The jurisdiction is required to enforce validation on a number of rules tables. This is the jurisdiction where the NMI is located, not the jurisdiction where its energy is supplied. |
Aggregate Flag | All retail connection points have this flag set to Y. Default to Y if the field is left blank. Options are Y or N. |
DLF Code* | Distribution Loss Factor. Must be a valid code stored in the CATS DLF code table. |
TNI Code* | Transmission Node Identifier. Identifies a Transmission Network Connection Point. Must be a valid code stored in the CATS TNI code table. |
NMI Classification Code* | Used to indicate the NMI classification. Values permitted include SMALL, LARGE, GENERATR, WHOLESAL, INTERCON, EPROFILE, and SAMPLE. Normal retail NMIs have a classification of LARGE or SMALL. |
NMI Status Code* | Used to indicate the status of the NMI. Values permitted include A for active NMI, D for De-energised, G for a Greenfield Site and X for extinct NMI. |
Embedded Network Parent | Identifies which embedded network this given NMI is the 'parent of'. If, on a NMI record, this field is not populated, it is assumed the NMI is not the parent of an embedded network. Blank for most NMIs. |
Embedded Network Child | Identifies the embedded network associated with the NMI. If this field is not populated, it is assumed the NMI is not associated with any other NMI (i.e. it is not in an embedded network). Blank for most NMIs. |
Building/Property Name | The full name used to identify the physical building or property location. |
Location Descriptor | A general field capturing various references to address locations alongside another physical location. |
Lot Number | The reference number allocated to an address prior to street numbering. |
Flat/Unit Type | The type of flat or unit, which is a separately identifiable portion within a building or complex. Values permitted include: APT, CTGE, DUP, FY, F, HSE, KSK, MSNT, MB, OFF, PTHS, RM, SHED, SHOP, SITE, SL, STU, SE, TNHS, U, VLLA, WARD, WE. |
Flat/Unit Number | The number of the flat or unit, which is a separately identifiable portion within a building or complex. |
Floor/Level Type | Used to identify the floor or level of a multi-storey building or complex. Values permitted include B, FL, G, L, LG, M, and UG. |
Floor/Level Number | Used to identify the floor or level of a multi-storey building or complex. |
House Number | The numeric reference of a house or property - specifically the house number. Note: Do not store the house suffix in this field. |
Street Name | The thoroughfare name. Do not include the number of the house or the street type (such as ST or RD). |
Street Type | The street type abbreviation. Examples are: ST, RD, AV. |
House Number Suffix | The modifier to a numeric reference of a house or property to identify a separate part. Specifically the single character identifying the house number suffix (for example A or B) as in a house number 54A. |
Street Name Suffix | Records any street suffixes. Values permitted include: CN, E, EX, OR, N, NE, NW, S, SE, SW, UP, W. |
Suburb/Locality* | The full name of the locality. |
State* | Defined State or Territory abbreviation. Values permitted include AAT, ACT, NSW, NT, QLD, SA, TAS, VIC, and WA. |
Postcode* | The numeric descriptor for a postal delivery area. |
DPID | Delivery point identifier allocated by Australia Post - the unique numeric descriptor for the postal delivery point that is equal to a physical address. |
Feeder Class | Feeder class data provided by participants. |
Customer Classification Code | Classifies the customer as BUSINESS or RESIDENTIAL. Set by the FRMP for the NMI. Displays according to the CR request selected. |
Customer Threshold Code | Classifies the customer load as LOW, MEDIUM, or HIGH. Set by the DNSP for the NMI. Displays according to the CR request selected. |
Creating or editing NMI datastreams
NMI Datastreams define the streams of Metering Data the MDM Meter Data Management system includes the Profile Preparation Service, Basic Meter Profiling, and Data Aggregation. component of MSATS expects to receive for any NMI (such as, connection point). Datastreams are streams of Metering Data that are associated with a connection point, as represented by a NMI. A NMI can have multiple Datastreams (for example, from one or more meters or from one or more channels or registers that comprise a single meter). Each Datastream is identified by a suffix.

To create a NMI Datastream:
- On the main menu, click Transactions and then click Change Requests.
- The Change Request - Search interface displays, click New.

- The Change Request - New interface displays. Click the Change Request drop-down arrow to select a change reason code for example, Create MDM Datastreams (4000 or similar). The change reason code selected determines the type of transaction to create. To learn more about change reason codes, Administration.
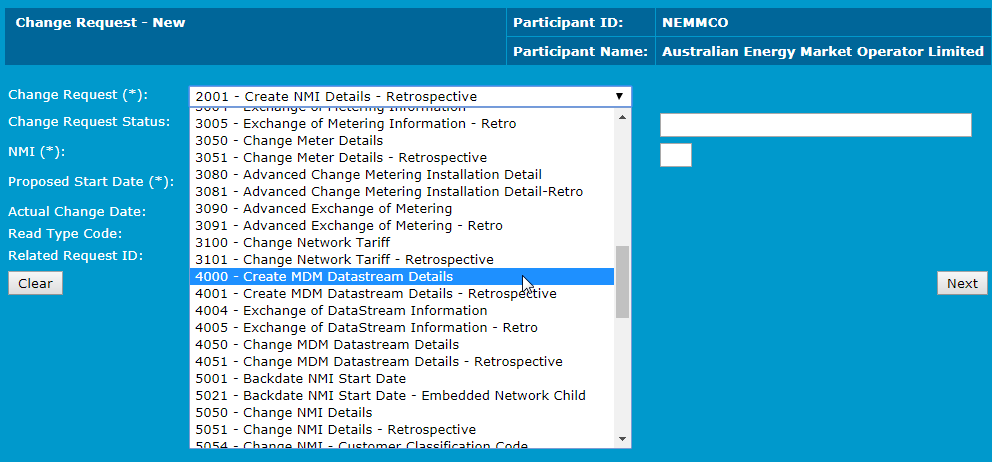
- The fields for the selected change reason code display. Complete the fields and click Next.
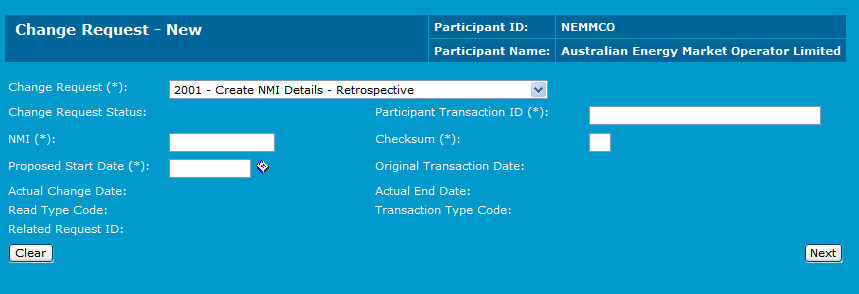
- The Change Request - Main interface displays. Scroll to the NMI Datastream - List at bottom of the interface and click New.

- The Change Request - New - Datastreams interface displays. Complete the Suffix field marked with an asterisk (*) and any other optional fields and click Save. For help understanding the fields, see Datastream fields.

- Click OK to the confirmation message.
- The NMI Datastream record is summarised in the NMI Datastream - List. Do one of the following:
- To make changes to the details before submitting, click Edit. If you select to edit an existing Datastream, the interface is blank, except for the suffix, even though each field has an existing value. Only complete the field(s) that you want to change. When you click Save, review and confirm the changes.
- To create a new Datastream record against the NMI, click New.
- Click Submit to create the new change request.

Important Note: if editing an existing NMI Datastream for example, using CR4051 or similar, the existing information is not displayed. The only field visible for NMI Datastreams is the Suffix field.

Datastream fields explains the Datastream fields. For more details, see MSATS Procedures All of the following procedures: CATS Procedures, WIGS Procedures, MDM Procedures, NMI Standing Data Schedule, NMI Procedure, and Part A of the NEM RoLR Processes. : CATS Procedure Principles and Obligations.
Field | Description |
|---|---|
Suffix* | A two-character identifier used in conjunction with a NMI to identify a particular Datastream. Each Datastream for a single NMI must have a unique suffix. The characters chosen for the suffix have some meaning. The rules for suffixes defined in the MSATS Procedures : CATS Procedure Principles and Obligations must be used (for example, suffixes for interval Metering installations begin with N and suffixes for Accumulation Metering Installations are numeric (such as 11). |
Type | Used to define what type of Metering Data the MDM expects. The Datastream type code is: I (Interval) if the streams of data contain 48 readings for each 24-hour period, each representing a specified 30-minute interval. This is the case for all interval type Metering installations, where there are actual values for each Settlement period, and non-metered installations, where calculated data is provided. It includes installations defined as types 1-5 and type 7 in jurisdictional metrology procedures. C (Consumption) if the streams of data consist of a single value that represents total consumption since the previous reading and a date, which represents the date the installation was read. Such Metering installations are referred to as Accumulation, Consumption, or Basic meters and are defined as type 6 Metering installations in jurisdictional metrology procedures. There is a further valid Datastream type: P (External Profile Data) This code is used if the data is actually an externally supplied profile shape (rather than one calculated by the MDM), for use in profiling consumption Metering Data, and not actual Metering Data to be settled. |
Profile Name | Identifies the name of the profile shape used to allocate a Datastream's consumption to trading intervals. The valid profile names are: NSLP (Net System Load Profile), which is a profile calculated by MSATS. NSLP represents the system load after all actual interval Metering Data or specified previously-calculated profiled Metering Data that is not dependent on the NSLP has been subtracted from a known total system load and represents system-wide usage by consumption-type Metering installations. CLOAD profile names beginning with CLOAD are controlled load profiles. Controlled load profiles are applied to controlled load Datastreams in NSW, SA and QLD. There is one controlled load profile for each LNSP area. The names all begin with CLOAD to indicate they are profile names followed by two characters to indicate the LNSP area to which it belongs. NOPROF is used for interval Datastream types to indicate that such Datastreams do not need to be profiled to obtain ‘readings’ for each Settlement interval because the data is supplied in 30-minute intervals. |
Average Daily Load | The electrical energy delivered through a Metering point’s Datastream over an extended period normalised to a "per day" basis, in kWh. |
Status Code | Used to indicate the status of the suffix. Options are A - active and I - inactive. A status code is set to A if this Datastream is required by MDM. This is the case if the FRMP is not the same as the LR (the data is required because the connection point requires settling in the wholesale market). Alternatively, its data is required for profile preparation purposes, as specified in jurisdictional metrology procedures. (For example, a jurisdiction may specify that energy usage by all interval-Metering installations must be subtracted from the system load to produce the NSLP. For such Metering installation types, even if the FRMP was the same as the LR, Metering Data is still required.) Controlled load Datastreams are also required by MDM because controlled loads, once profiled based on sample Metering Data, they are also subtracted from the system load as part of the process of calculating the NSLP. |
Creating or editing NMI metering installation details
NMI meter register records contain data that is stored about the meters for a given NMI (such as, connection point). Some of the details recorded are the next scheduled read date (if it is manually read), the Metering installation type, the physical location details and the manufacturer’s details.
To create a record for a new NMI meter installation:

- On the main menu, click Transactions and then click Change Requests.
- The Change Request - Search interface displays, click New.

- The Change Request - New interface displays. Click the Change Request drop-down arrow to select a change reason code for example, Create Meter Details (3001 or similar) or Change Meter Details (3050 or similar). The change reason code selected determines the type of transaction to create. To learn more about change reason codes, see Administration.
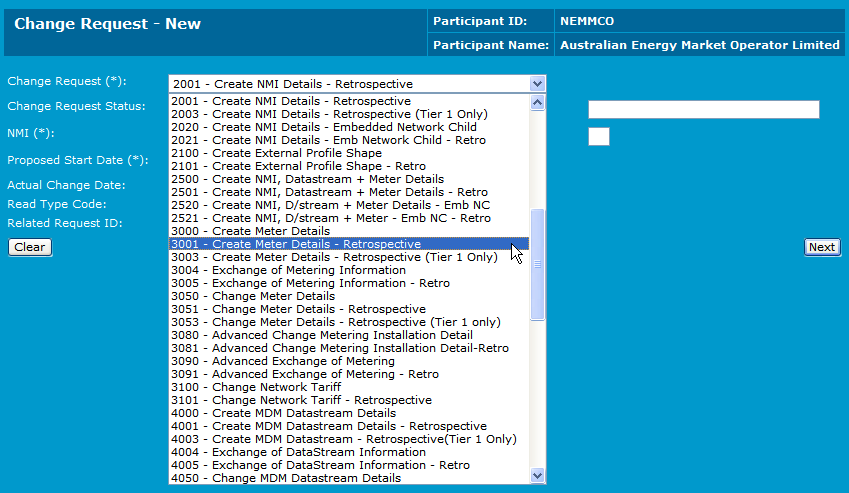
- The fields for the selected change reason code display. Complete the fields and click Next.

- The Change Request - Main interface displays. Scroll to the NMI Meter Register - List at bottom of the interface and click New.
If there are no serial numbers in the list, then there are currently no Metering installations created for this NMI. If the NMI Meter Register - List heading is not displayed, you cannot create or modify Metering installations using this change reason code.

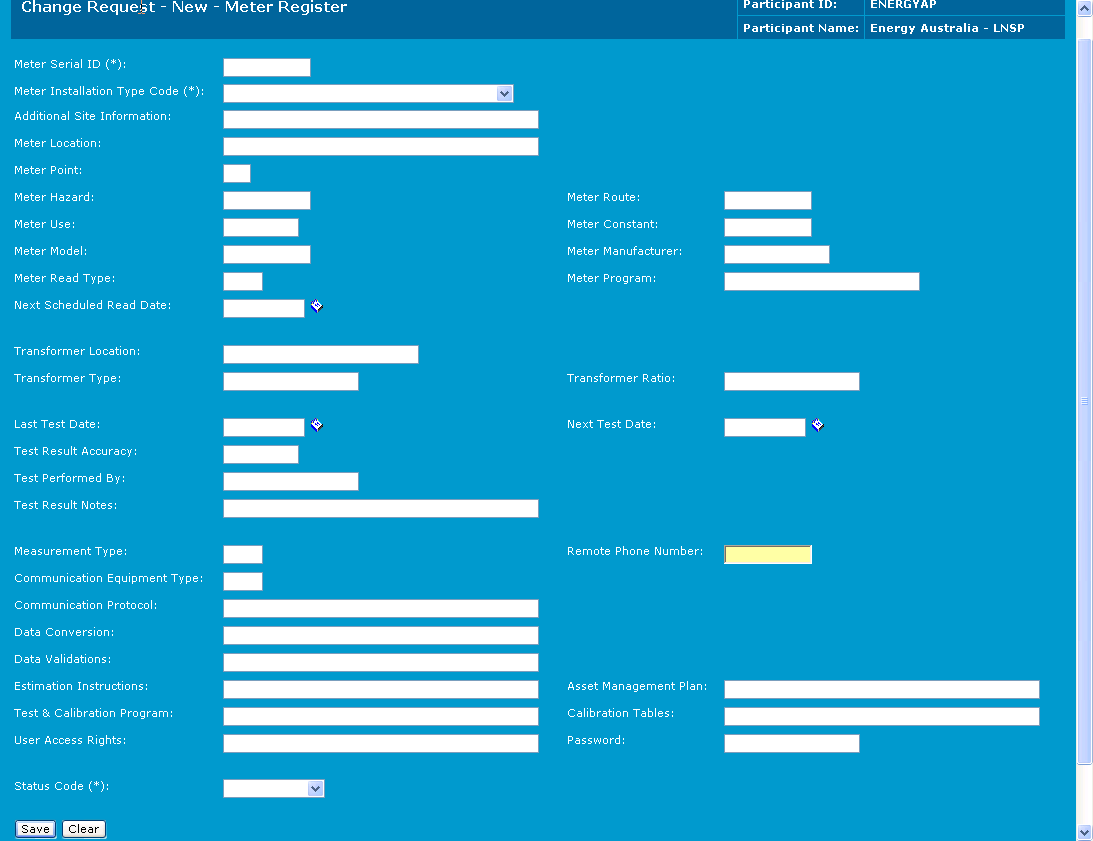
- The Change Request - New- Meter Register interface displays. Complete each of the required fields marked with an asterisk (*) and any optional fields and then click Save. For help understanding the fields, see NMI Metering Installation fields.
- Click OK to the confirmation message.
- The NMI meter register record is summarised in the NMI Meter Register- List. Do one of the following:
- To make changes to the details before submitting, click Edit. If you select to edit an existing Metering installation, the interface is blank, except for the Serial ID even though each field has an existing value. Only complete the field(s) that you want to change. When you click Save, review and confirm the changes.
- To create a new Metering installation record against the NMI, click New.
- Click Submit to create the new change request.

NMI Metering Installation fields explains the NMI Metering installation fields. For further information, see the document MSATS Procedures: CATS Procedure Principles and Obligations.
Table 41 NMI Metering Installation fields
Field | Description |
|---|---|
Meter Serial ID* | The meter serial number uniquely identifies a meter for a given NMI. The same meter serial number can be used more than once providing it belongs to a different NMI. |
Additional Site Information | Additional information that describes the location of the Metering installation. |
Meter Location | Code or text indicating where the meter is physically located at the premises. |
Meter Installation Type Code* | Indicates the Metering installation type: BASIC - Consumption Type Metering installation (type 6) COMMSn - Interval type Metering installations, read remotely (i.e. using a modem). (types 1-4) MRIMManually-read interval Metering installation (type 5) UMCPUnmetered connection point (type 7) |
Meter Point | An additional Metering identifier field. |
Meter Hazard | Code or text indicating any dangerous conditions identified at the meter site. |
Meter Route | The route identifier the meter is currently being read in. |
Meter Use | Code indicating revenue meter, check meter, load research, etc. |
Meter Constant | Multiplier applied to the meter to arrive at the consumption. |
Meter Model | The manufacturer’s model number. |
Meter Manufacturer | The manufacturer’s code. |
Meter Read Type | Code indicating how the meter is read, examples include mechanical dial, display, local handheld, local laptop, remote dial-up, remote radio, remote mobile. |
Meter Program | For programmable meters, identifiers of the program run at the meter. |
Next Scheduled Read Date | Indicates the scheduled next manual read date. Only required for NMIs where the Metering Installation Type is Basic or MRIM. |
Transformer Location | Indicates where the transformer is in relation to the meter (if installed). |
Transformer Type | Type of transformation employed. |
Transformer Ratio | Instrument transformer ratios (available and connected). |
Last Test Date | Last date the meter was tested. |
Next Test Date | Next date the meter is tested. |
Test Results Accuracy | The accuracy of the meter from the last test. |
Test Performed By | Who performed the last test. Used to store a company or individual name. |
Test Result Notes | Any text or further test information. |
Measurement Type | Code indicating how the meter is measuring, example values include aggregate consumption, programmable, interval. |
Remote Phone Number | The phone number for remote access. |
Communication Equipment Type | Indicates modem or other communication device types. |
Communication Protocol | Description of how the devices communicate. |
Data Conversion | Description of details needed to translate data received from a communication device. |
Estimation Instructions | Description of how the meter is estimated if no read can be obtained. |
Asset Management Plan | Description or reference of asset management plan. |
Test & Calibration Program | Description or reference of test and calibration plan. |
Calibration Tables | Details of any calibration factors programmed into the meter. |
User Access Rights | Details of any end use customer access to the Metering installation. Examples include pulse outputs, interface to customer load management system, or customer directly accessing data in meter through special agreement. |
Password | Password for gaining remote access to the Metering installation. |
Status Code | Indicates whether the Metering installation is current (in use) or has been removed. Valid values are: C - current R - removed |
Creating or editing NMI register identifier details
NMI register records contain data that is stored against meter register identifiers for a given Metering installation associated with a NMI. These records contain information such as, the register ID, network tariff code and a code representing the unit of measure. Each Metering installation can have multiple registers.
To create a NMI register:

- On the main menu, click Transactions and then click Change Requests.
- The Change Request - Search interface displays, click New.

- The Change Request - New interface displays. Click the Change Request drop-down arrow to select a change reason code for example, Create Meter Details (3001 or similar) or Change Meter Details (3051 or similar). The change reason code selected determines the type of transaction to create. To learn more about change reason codes,Administration.

- The fields for the selected change reason code display. Complete the fields and click Next. For help understanding the fields, see NMI Metering Installation fields.

- The Change Request - Main interface displays. Scroll to the NMI RegisterIdentifier - List at bottom of the interface and click New.
Note: if there are no serial numbers in the list, then there are currently no Metering installations created for this NMI. If the RegisterIdentifier - List heading is not displayed, you cannot create or modify Metering installations using this change reason code.

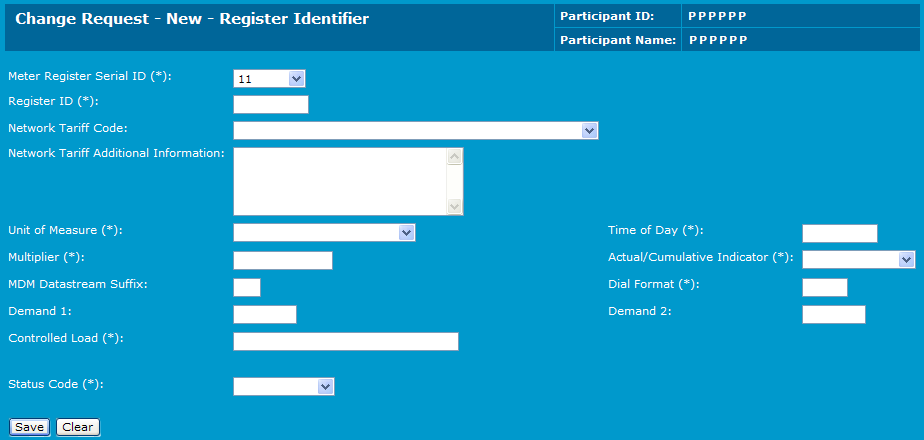
- The Change Request - New - Register Identifier interface displays. Complete each of the required fields, and any optional fields and then click Save. For help understanding the fields, see NMI register fields.
- Click OK to the confirmation message.
- The NMI register record is summarised in the NMI Register Identifier- List. Do one of the following:
- To make changes to the details before submitting, click Edit. If you select to edit an existing Metering installation, the interface is blank, except for the Serial ID even though each field has an existing value. Only complete the field(s) that you want to change. When you click Save, review and confirm the changes.
- To create a new Metering installation record against the NMI, click New.
- Click Submit to create the new change request.

Field | Description |
|---|---|
Meter Register Serial ID* | The meter serial number is an alphanumeric identifier that uniquely identifies a meter for a given NMI (i.e. it must be unique for this NMI). In this table, it identifies the Metering installation associated with the NMI. The meter serial number must exist or have been created on the change request that is creating this register Id. |
Register ID | The register ID uniquely identifies each register associated with the Metering installation. Each register is a unique data source that is obtained from the meter. A single meter may provide multiple data sources. |
Network Tariff Code | The Network Tariff Code is a code that represents the network tariff that is applied by the LNSP for consumption measured by this register. LNSPs supply the network tariff codes. Each LNSP is required to publish a definition of what each code represents. This can normally be found on the LNSP’s own web site. |
Network Tariff Code Additional Information | Free text field for any other information relating to the network tariff code. |
Unit of Measure | Code to identify the UOM for data held in this register. Examples: KWH, WH, KVARH, KVA, KW, VAR, VARH, V, A. |
Time of Day | Industry developed codes to identify the time validity of register contents. For Interval meters, use code “INTERVAL”. A possible group of codes might be: TOTAL, PEAK, SHOULDER, OFFPEAK, CONTROLLED, DEMAND, WEEKEND, PUBHOL |
Multiplier | Multiplier required to take a register value and turn it into a value representing billable energy. |
Dial Format | Describes the register display format .First number is the number of digits to the left of the decimal place, and the second number is the number of digits to the right of the decimal place |
MDM Datastream Suffix | A code allowing this register to be associated with a Datastream suffix (i.e. all registers with the same suffix contribute to the same Datastream). Originally, this field had to contain a suffix that existed on the CATS_NMI_Data_Stream table. That validation is no longer required. This allows for both energy and non-energy suffixes to be defined |
Controlled Load | CIndicates whether the energy recorded by this register is created under a controlled load regime. This field has "No" if the register does not relate to a controlled load. If the register relates to a controlled load, it contains a text description of the controlled load regime |
Status Code | Indicates whether the register is current (in use) or has been removed. No information is deleted from MSATS so, if a Metering installation is replaced, the Metering installation itself and the registers associated with the Metering installation have their status code updated to reflect that they are no longer there. It is possible to see the date from when a register was removed. Valid values are: Ccurrent Rremoved |
Actual/Cumulative indicator | Actual/Subtractive Indicator. Actual implies volume of energy actually metered between two dates. Cumulative indicates a meter reading for a specific date. A second meter reading is required to determine the consumption between those two read dates. Valid values are: Aactual Ccumulative |
Demand1 | This field contains the peak demand value for Summer for network tariff purposes. Units in kW or kVA. Only required for a small number of specialised network tariff codes. |
Demand2 | This field contains an additional demand value (not Summer period). Units in kW or kVA. Only required for a small number of specialised network tariff codes. |
