Last modified: 04 December 2024
Setting Up a Standard DI Environment
For help upgrading an existing DI environment, see Upgrading a DI Environment.
AEMO recommends setting up your first Data Interchange (DI) environment in pre-production. Once you have a successful pre-production installation (used for testing), you can repeat the installation in production to receive live market data. Be careful to always keep the pre-production and production data entirely separate.
A standard DI environment is a single data feed, from one Participant ID folders on the participant file server, to a single participant database. For example, you can have your pre-production environment connected to the participant file server pre-production environment and your production environment connected to the participant file server production environment.
AEMO’s production and pre-production environments are independently operated, so the set of components shown in Figure 8 are duplicated for production and pre-production. To set up a standard Data Interchange environment, follow the steps in Table 3.
Do not point your pre-production environment to the AEMO production environment or vice versa.
All participants are encouraged to use the pre-production environment to test implementation and to train their participant users, before attempting any changes or operations on the production systems.
Figure 8 Standard Data Interchange implementation
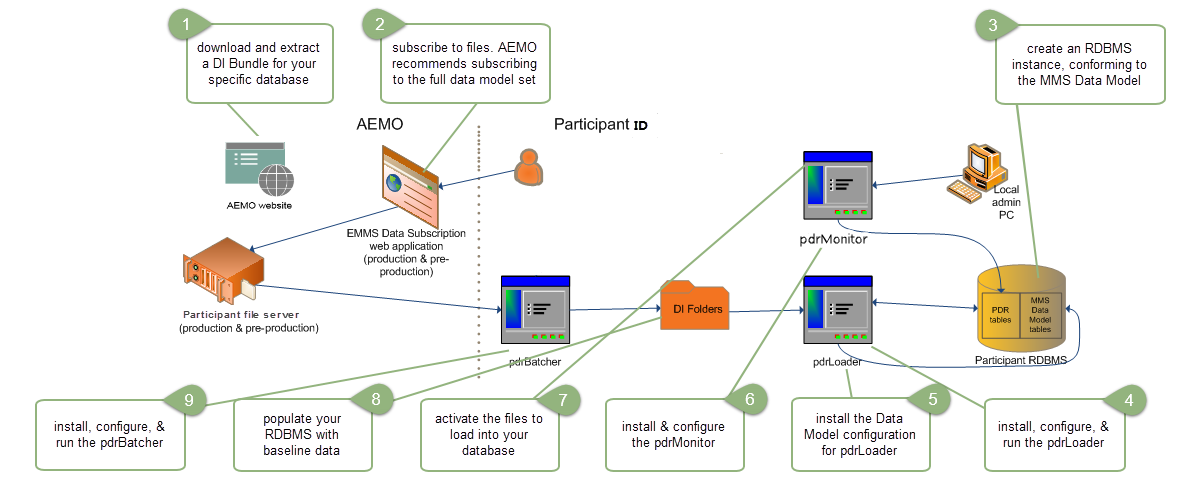
Table 3 Steps to set up a standard Data Interchange environment
|
Step |
Task |
Component |
References |
|---|---|---|---|
|
1 |
Download and extract a DI bundle for your specific database (Oracle or SQL Server) |
Data Interchange Bundle |
Electricity data model (MMSDM). Release Notes |
|
2 |
Create an RDBMS instance, conforming to the Electricity Data Model:
|
Electricity Data Model (MMSDM) Gas Data Model (GASDM) |
|
|
3 |
Set up Data Subscription Services |
Data Subscription web application |
|
|
4 |
Install and configure the Participant Data Replication Loader (pdrLoader) |
pdrLoader |
|
|
5 |
Run the pdrLoader application:
|
pdrLoader |
|
|
6 |
Copy the Data Model configuration for pdrLoader |
pdrLoaderConfiguration |
|
|
7 |
Install and configure the pdrMonitor:
|
pdrMonitor |
|
|
8 |
Activate the files to load into your database |
pdrMonitor |
|
|
9 |
Populate your database with data:
You can request historical data on CD from AEMO’s Support Hub |
pdrLoader input folder |
|
|
10 |
Install the Participant Data Replication Batcher (pdrBatcher) |
pdrBatcher |
|
|
11 |
Run the pdrBatcher application:
|
pdrBatcher |